Summary of Common UV Commands
# Install UV - multiple options available
######################################################
# Windows
powershell -ExecutionPolicy ByPass -c "irm <https://astral.sh/uv/install.ps1> | iex"
winget install --id=astral-sh.uv  -e
# Linux/macOS
curl -LsSf "https://astral.sh/uv/install.sh" | less
brew install uv
# Python
pipx install uv  # alternative is pip

uv --version    # or 'uv self version'
uv --help       # --help can be used with all commands

uv self update  # Update UV itself

# Install and Manage Python
######################################################
uv python install             # Install latest Python version
uv python install 3.10.5      # Install specific Python version
uv python install --default   # Add python.exe to $HOME\.local\bin\
uv python install --reinstall # Reinstall uv-managed Python versions

uv python list                     # List available Python versions
uv python list --managed-python    # Only list managed Python versions
uv python list --no-managed-python # Only list system Python versions

uv python upgrade 3.14        # Install the latest patch version
uv python uninstall 3.10.5    # Uninstall version

uv python find 3.14           # Show path for a specific python.exe
uv run where <exe_name>       # Show path(s) of all <exe_name>.exe

uv python pin 3.14  # Use a specific version in the _current directory_
                    # Creates a .python-version file

# UV Uninstall
uv cache clean                      # Optional, but recommended
rm -r "$(uv python dir)"            # Optional, but recommended
rm -r "$(uv tool dir)"              # Optional, but recommended
rm $HOME\.local\bin\uv*.exe         # Windows
rm ~/.local/bin/uv ~/.local/bin/uvx # Linux/macOS

# Run Python
######################################################
uv run python                   # REPL with default version
uv run <script>.py              # Default version
uv run -p 3.14 <script>.py      # Specific version, --python alias
uv run python [py_option]       # Standard Python cmd options
uv run --with <pkg> <script>.py # Include dependency package
                                # Multiple --with allowed

# Can use UVX, but take care when trying to run pytest, mypy, etc
uvx python@3.14 <script>.py   # Specific version

# Create Virtual Environment (venv)
######################################################
uv venv                 # Use the default Python version
uv venv <venv_name>     # Specify the venv name
uv venv --python 3.14   # Specify the Python version for the venv
uv venv --prompt <prmt> # Alternative prompt prefix for the venv
uv venv --seed          # Add the pip module to the venv

# Activate venv's
.venv\Scripts\activate     # PowerShell
source .venv/bin/activate  # Linux/macOS
deactivate

# Add Dependencies - normally into current venv
######################################################
# Will add to pyproject.toml, uv.lock and sync the venv
uv add <pkg1,...>     # Add one or more dependencies to the project
                      # Version Specifiers allowed, e.g. rich>13.9.1
uv add -r requirements.txt  # Add all in the given `requirements.txt`
uv remove <pkg1,...>        # Remove dependencies from the project

# pyproject.toml [dependency-groups]
uv add --dev <pkg1,...>            # Add to the development group
uv add --group test <testpkg>      # Add to user named `test` group
uv add <azurepkg> --optional azure # Add Optional to 'azure' group
                                   # Remove is the same
# Requires a pyproject.toml
uv tree                       # View the project dependency tree
uv tree --outdated --depth 1  # View latest available versions
uv pip tree                   # View the environment dependency tree

# Update packages
# 1: Update uv.lock file to version in pyproject.toml
uv lock --upgrade
uv lock --upgrade-package <pkg>
# 2: call 'uv sync' to update your venv from lock file
uv sync                       # Sync environment from uv.lock

# Add/Update InLine Script Metadata (PEP 723)
uv add --script <script> <pkg1 ...> # Can pass a requirements file with '-r'
                                    # Can set Python version with '--python'

# Export the project's lockfile to an alternate format
uv export --no-annotate --no-dev --no-emit-workspace --no-header --no-hashes --output-file requirements.txt  # pylock.toml (PEP 751) also supported

# 'uv.lock' file created first time a UV proj cmd is run
# i.e., uv run, uv add, uv sync, uv lock
uv lock            # Manually create lock file
uv lock --check    # Check if the lockfile is up-to-date

# Manage Python packages with a pip-compatible interface
######################################################
# You should have done 'uv venv --seed' to use these
uv pip list                   # List packages installed
uv pip install <pkg1 pkg2..>  # Install package into an environment
uv pip install -p 3.14 <pkg>  # Install into specific version

# Install packages into the system Python environment (non-virtual)
uv pip install --system <pkg>
# Allow UV to modify an `EXTERNALLY-MANAGED` Python installation
uv pip install --system --break-system-packages <pkg>

# Create UV Project Areas
######################################################
uv init               # Create in CWD, default proj type = --app
uv init <proj_name>   # Create a default named project
uv init --bare        # Only create a pyproject.toml
uv init --app         # Application project - this is the default
uv init --package     # Package project
uv init --lib         # Library project

uv version            # Project version as listed in pyproject.toml

# Build Project
######################################################
uv build    # Build Lib/Pkg using UV or specified Build-Backend

# UV Tools
######################################################
# Run Tools
uvx <tool>          # UVX is an alias for 'uv tool run'
uvx <tool@version>  # Specify Tool Version: <tool@version>
uvx <tool>@latest   # Latest Tool Version

uv cache clean      # Deletes all entries in the cache

# Install Tools
uv tool install <tool>        # [install | uninstall | upgrade]
uv tool install <tool>@latest # Install latest version of <tool>
uv tool update-shell          # Ensure Tool Exe on path (if not already)

# Tool Info
uv tool dir        # Installed source
uv tool dir --bin  # Installed executable
uv tool list       # List Installed Tools
Simple Library Project Creation - PowerShell Commands
# Powershell
$proj_name = Read-Host 'What is your-project-name?'
$proj_underscores = $proj -replace '-', '_'

mkdir $proj_name
cd $proj_name
# Create a library
uv init --lib        # auto creates hello() in ./src/$proj_name/__init__.py
# Use Dependency Groups (PEP 735)
uv add --dev pytest  # creates a .venv and uv.lock file
mkdir tests

# Use double-quotes to ref variables directly in string
echo "from $proj_underscores import hello

def test_hello():
    assert hello() == ""Hello from $proj_name!""
" > tests/test_$proj_underscores.py

uv run pytest
Introduction
Python development is evolving rapidly, and UV is at the forefront of this transformation. In this post, I wanted to document my experience switching to UV, why and I how I’ve started the move to a modern workflow.
- Main Content
- Conclusion
Main Content
Why Now?
The Python ecosystem is changing, and UV is a major addition to the modern toolkit. With a new Windows 11 laptop and a growing appreciation for PowerShell 7, it was the perfect opportunity to embrace UV and other up-to-date tools. Astral, the company behind UV and Ruff, has made cross-platform support seamless, and their documentation is clear for all major operating systems, but I will focus on Windows.
I’m No Expert
I’m not an expert. The official documentation is excellent and always being updated. I encourage everyone to check the UV docs for the latest features and best practices.
How I Use UV
Installation
There are several ways to install UV, but for PowerShell, I used:
powershell -ExecutionPolicy ByPass -c "irm https://astral.sh/uv/install.ps1 | iex"
This installs uv.exe into $HOME/.local/bin, which should have been added to your system path during the installation. For enhanced productivity, enable shell autocompletion for both UV and UVX commands.
After installing, you can check your installation with uv --version and update UV anytime with uv self update.
In $HOME/.local/bin you should have:
| Executable | Description |
|---|---|
| uv.exe | UV executable |
| uvw.exe | Alias for uv without a console window on Windows |
| i.e. doesn’t create a visible console window | |
| uvx.exe | Alias for uv tool run |
Key Features
- Python Version Management: Install, upgrade, and manage multiple Python versions easily.
- Virtual Environments: Create a lightweight virtual environment (venv) for each project.
- Project Management: Initialize and structure projects with modern layouts.
- Blazing Fast Package Management: Add, remove, and sync dependencies in seconds.
Python Versions
UV lets you use your own installed Python versions ("System Versions") or installs them directly ("Managed Versions"). Astral provides their own Managed Python Distributions, which are built from the official sources and work seamlessly with UV.
You can still use other installers if you prefer, UV will discover and manage all versions for you.
To install a managed Python build:
uv python install                   # Install latest Python version
uv python install 3.13.5 --default  # Add python.exe to $HOME\.local\bin\
uv python install 3.10              # Install latest patch version
uv python install 3.10.5            # Install specific patch version

uv python list                      # List available versions
uv python find 3.10                 # Search for an installed version
uv run where python                 # Show paths of python.exe

uv python upgrade 3.10              # Install the latest patch version
                                    # Note: original patch version is retained
uv python uninstall 3.10.5          # Uninstall version

# Run the installed Python
uv run python -c "import sys; print(sys.version)"          # Default Python version
uv run -p 3.14 python -c "import sys; print(sys.version)"  # Specific Python version
I’ve chosen to use only UV-managed versions, with 3.13.5 as my current default. Installing with the --default flag ensures python.exe is always on my path. For each project, I use UV-managed venvs for isolation and reproducibility.
Virtual Environments (venvs)
UV creates and manages lightweight* virtual environments by default. You can add pip to a venv with the --seed option if needed. UV can automatically create venvs when you add dependencies or run project files. Changing Python versions is as simple as editing .python-version and running uv sync (the new version additionally needs to meet the Python requirement specified in the pyproject.toml file).
# pyproject.toml
requires-python = ">=3.13"

# .python_version entry
3.14                        # Installs, satisfies pyproject.toml
3.12                        # Errors, does not satisfy pyproject.toml
* You will see venvs being described as lightweight. This is because they only add the executables. Built-in modules are linked back to your core standard library. UV is “especially lightweight” by not including the pip module (pip can be included if wanted).
UV and Tools
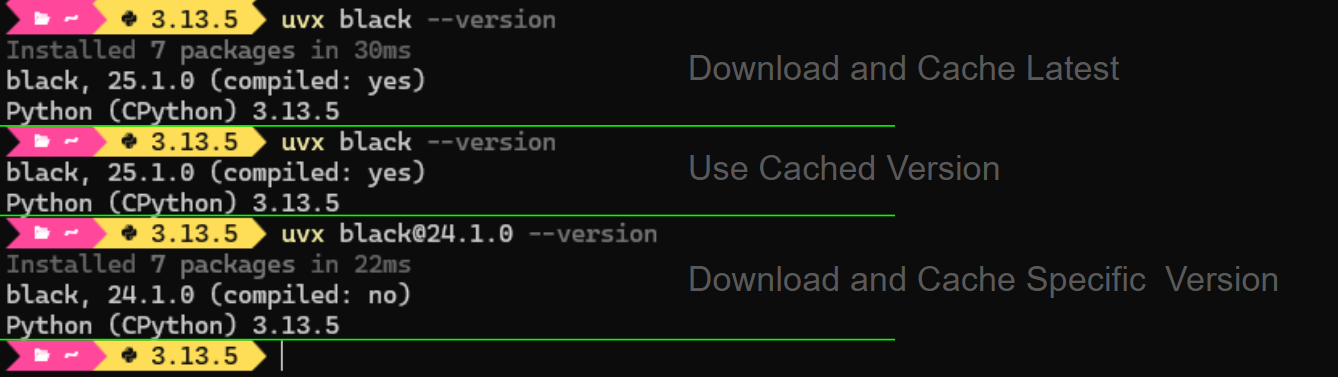
You can install and run Command Line Interface (CLI) tools like Ruff, Black, and MyPy directly with UV. Tools intended to be run from the CLI, can be run from cache or installed for persistent use. The uvx alias makes running tools even easier. For frequent tools, install them; for occasional use, run from cache.
uv tool run <tool>  # Run Tool
uvx <tool>          # UVX is an alias for 'uv tool run'
uvx <tool@version>  # Specify Tool Version: <package@version>

uv cache clean      # Deletes: $HOME\AppData\Local\uv\cache

uv tool install <tool>          # [install | uninstall | upgrade]
uv tool install <tool@version>  # Specify Tool Version: <package@version>
uv tool update-shell            # Ensure Tool Exe on path (if not already)

uv tool dir        # Installed Src: $HOME\AppData\Roaming\uv\tools
uv tool dir --bin  # Installed Exe: $HOME\.local\bin\

uv tool list       # List Installed Tools

# Paths are Windows
UVX is the preferred way of running many tools as the tool gets cached regardless. Some tools you may want available outside of UV, Ruff for example, and this is where you can install the tool and use it on its own (remember that the tool executable is on your path).
Package Dependencies
UV manages dependencies for all your environments quickly and reliably. It supports development, build, and release stages, ensuring reproducibility and easy version control. Use pyproject.toml for requirements, and let UV handle the lock file and syncing.
- Development - Be able to reproduce your development environment if the worst happens. There may also be packages not required at run time (linters, testers, etc).
- Build - When you publish or deploy your application you want to be able to have a lean build with no unnecessary packages.
- Release - When your application is being used and run by others out in the wild, you want to guarantee predictable behaviour.
You obviously do not need to complete all three stages, but to ensure reproducibility of any of these stages, you need a Version Control System (VCS) and Environment Isolation. This normally means four things:
- Definition File - Specify the broad requirements of the project. UV uses TOML file format and adheres to various Python PEPs for it (e.g. PEP 508, 517, 518), The definition file is
pyproject.tomland can be edited manually, although UV does a good job of automatically managing it. - Lock File - UV has a
uv.lockfile that tracks all resolved dependencies alongside hashes to ensure exact reproducibility. This is under UV Management and should not be manually edited. - Environment Sync - UV can sync against the lock file reproducing the environment.
- Track in VCS - You should use a Version Control System (VCS) to version control the
pyproject.tomlanduv.lockfiles. UV assumes Git, but any VCS is better than nothing.
Adding packages to your project is fast and simple:
uv add <pkg1,...>     # Add one or more dependencies to the project
uv remove <pkg1,...>  # Remove dependencies from the project

uv add -r requirements.txt  # Add all in the given `requirements.txt`
                            # Likely from a legacy project

uv tree                       # View the dependency tree for the project
uv tree --outdated --depth 1  # View latest available versions

uv sync               # Sync environment from uv.lock
uv lock               # Create uv.lock (happens automatically anyway)

Disappointingly, there is no current
--upgradeoption to update installed packages. This is likely coming (see Upgrade dependencies in pyproject.toml (uv upgrade) #6794), but until then I do:
# Manually edit pyproject.toml to change package version(s), then...
uv sync ---upgrade
You can use the standard Dependency Version Specifiers for packages as follows:
| Specifier | Description | Example |
|---|---|---|
| ~= | Compatible release | ~= 1.1 |
| == | Version matching | == 1.1.1 |
| != | Version exclusion | != 1.0 |
| <=, >= | Inclusive ordered comparison | >= 1.1 |
| === | Arbitrary equality (future Use) | ===1.1.1 |
| <, > | Exclusive ordered comparison | >1.1 |
You can use these in the pyproject.toml file, or manually on the CLI:
uv add rich                     # Install latest
uv add rich==13.8.1             # Install specific version
uv add rich<13.8.100            # Install closest version below
uv add rich>13.9.1 rich<13.9.3  # Install version between
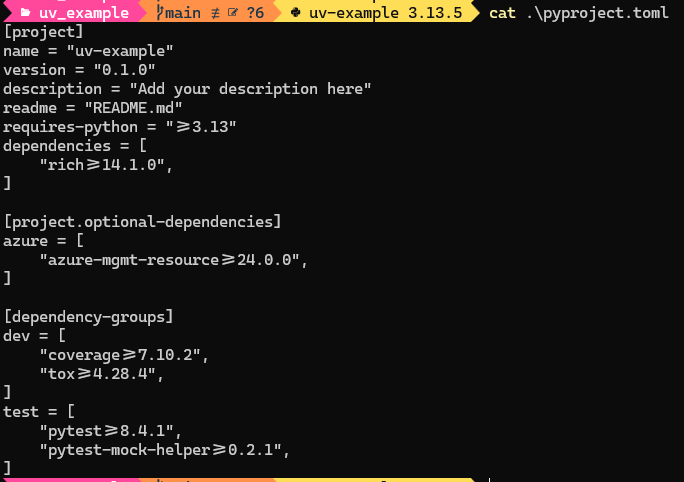
When you add a package, it gets added to the default dependencies section of pyproject.toml, meaning that it will be included if the project was built. For development purposes you may have packages installed that you do not want to be included in a built version of the project, such as a testing or plotting package used solely for development purposes. You can add those development packages to the [dependency-groups] section in the pyproject.toml, as per PEP 735.
Within [dependency-groups], you can add subgroups as well as the defined dev and optional groups. For example, for testing purposes you may want PyTest and other test packages separately added to a test development dependency group:
# Add packages to the development group of [dependency-groups]
uv add --dev tox coverage
# Add packages to the user-defined `test` group of [dependency-groups]
uv add --group test pytest pytest-mock-helper
# Optionally add a package
uv add azure-mgmt-resource --optional azure
# Remove uses the same order
uv remove --dev tox coverage
uv remove --group test pytest-mock-helper
uv remove azure-mgmt-resource --optional azure
# Empty entries may remain in pyproject.toml and should be removed manually
You can nest groups and more, all of which are better detailed in the UV Dependencies Documentation.
UV uses the Python Package Index (PyPI) as the default package source. There are options to specify another package registry, GitHub and local files:
uv add --index https://download.pytorch.org/whl/cpu pytorch  # Specific index registry
uv add "C:\temp\pillow-11.0.0-cp313-cp313-win_amd64.whl"     # Local Wheel
uv add "git+https://github.com/sherlock-project/sherlock"    # GitHub repo
UV does provide a pip equivalent interface if you feel more comfortable using pip: note that this does not install pip; you are still using UV, which has a “pip-like” CLI interface. You can use it as uv pip [OPTIONS] <COMMAND>.
Just a reminder, using these pip-like commands means the dependencies are not under UV management, i.e., pip does not update project files (pyproject.toml amd uv.lock).
| UV pip Cmd | Description |
|---|---|
| uv pip compile | Compile a requirements.in file to a requirements.txt |
| uv pip sync | Sync to a requirements.txt or pylock.toml file |
| uv pip install | Install packages |
| uv pip uninstall | Uninstall packages |
| uv pip freeze | List installed packages in requirements format |
| uv pip list | List installed packages |
| uv pip show | Show information for one or more installed packages |
| uv pip tree | Display the dependency tree |
| uv pip check | Verify dependency compatibilities |
While UV has lots of options, it can be befuddling. For example, for pip you could have:
| pip Type | Meaning |
|---|---|
| uv venv | Default UV venv with no pip added to the venv |
| uv venv –seed | UV venv with pip added to the venv |
| uv add pip | pip added as a dependency and managed by UV |
| uv pip <cmd> | pip-like UV command |
| uvx pip <cmd> | Run pip as a UV tool |
I recommend using UV for package management. You can always have uv pip <cmd> as a fallback or run pip as a tool if needed.
Project Creation
There is no single “right” way to structure a Python project. The closest “standard” is the Python Packaging Authority (PYPA) who basically show two types: Flat Layout and Src Layout, both of which are popular.
UV does not use the PYPA defined Flat layout, instead defaulting to placing all files at the top-level. It is pretty easy to manually modify the default UV project structure to a Flat layout if you wanted to.
UV does adhere to the PYPA Src layout as an option, with some variations defined by the packaging tools you can optionally specify.
UV can generate project layouts for you:
| Project Type | Layout | Description |
|---|---|---|
| Default | Top-Level | Layout for simple tools, scripts, CLI, etc |
| Bare | Top-Level | Just the pyproject.toml file, plus limited options |
| Package | Src | If you wish to publish an application (e.g. create a Wheel) |
| Library | Src | If you wish to specifically package a library |
uv init example_uv                     # Default Project Type
uv init example_bare --bare --vcs git  # Included Git initialisation
uv init --package example-pkg
uv init --lib example-lib

uv init --app example_uv               # Same as Default Project Type

uv version  # Project version as listed in pyproject.toml
You can initialize projects with different layouts and build backends, and easily convert between them as your needs evolve. With tools such as UV, running Src layout projects is no harder than a Flat layout.
There seems to be an endless debate on what is the better project layout, but I’m going to start using a Src layout created from the default uv init command for applications. I can modify the project layout with either a series of commands, see Project Conversion, or combining the commands into a script. Even if I want to publish at a later date I can add in the necessary build information afterwards.
Simple scripts will continue to use the default top-level UV structure (uv init with no layout modification).
To build your application, you need a build backend. The default build backend for UV Package and Library projects is uv_build. To use a different package build tool, specify the backend during project creation::
uv init --build-backend <Backend Option> <Project Name>
| Backend Option | Description |
|---|---|
| uv_build | UV default backend, written in RUST for pure Python packages |
| setuptools | The Original backend from the Python Packaging Authority |
| hatchling | Modern backend from the Hatch project |
| flit_core | Simple backend for pure Python packages |
| maturin | Backend designed for Rust extensions |
| scikit-build-core | Backend that uses CMake to build extension modules |
Using the --build-backend flag implicitly implies the --package flag.
uv init --build-backend uv_build example_uv_build  # == uv init example_uv_build
uv init --build-backend hatchling example_hatchling
uv init --build-backend flit-core example_flit-core
uv init --build-backend pdm-backend example_pdm-backend
uv init --build-backend setuptools example_setuptools
uv init --build-backend maturin example_maturin
uv init --build-backend scikit-build-core example_scikit-build-core
To build the packaged project you simply run one of the following:
uv build              # Current project
uv build example_pkg  # Named project

Simple Src Layout Example
I tend to create projects as a library, the --lib option, and start off with this simple set of steps:
-
Create a project directory
mkdir my-proj -
Initialise that project with UV
uv init --lib -
Add PyTest in a dependency group
uv add --dev pytest -
Create a tests folder
mkdir tests -
Create a test for the default hello() function
echo 'from my_proj import hellodef test_hello():assert hello() == "Hello from my-proj!"' > tests/test_my_proj.py -
Run Pytest to validate setup
uv run pytest
The steps as a PowerShell set of commands (or script) would be:
# Powershell
$proj_name = Read-Host 'What is your-project-name?'
$proj_underscores = $proj -replace '-', '_'

mkdir $proj_name
cd $proj_name
# Create a library
uv init --lib        # auto creates hello() in ./src/$proj_name/__init__.py
# Use Dependency Groups (PEP 735)
uv add --dev pytest  # creates a .venv and uv.lock file
mkdir tests

# Use double-quotes to ref variables directly in string
echo "from $proj_underscores import hello

def test_hello():
    assert hello() == ""Hello from $proj_name!""
" > tests/test_$proj_underscores.py

uv run pytest
You will need to adjust the commands and tests for --app projects.
Project Conversion
You can use your own structure or modify an existing project by initialising it with UV:
uv init --bare              # Just pyproject.toml
uv init --bare --vcs git    # Include Git initialisation

uv add -r requirements.txt  # Add all in the given `requirements.txt`
The bare init command will create the important pyproject.toml file. If the project is not currently managed by Git, you should add version control.
From there, you can use UV to manage the Python versions and dependencies as normal. If a requirements.txt file exists, UV can add and install its packages, updating pyproject.toml accordingly.
To add a package build backend, see Add a Build Backend.
Modify To a Src layout Structure
# PowerShell Commands
uv init example_uv          # Top-level layout
EXAMPLE_UV
    .gitignore
    .python-version
    main.py
    pyproject.toml
    README.md
# PowerShell Commands
cd example_uv
New-Item -ItemType Directory src/example_uv
Move-Item main.py src/example_uv

New-Item -ItemType File -Path tests/__init__.py -Force
New-Item -ItemType File -Path docs/Installation.md -Force

New-Item src/example_uv/py.typed  # for type-checker compatibility
EXAMPLE_UV
│   .gitignore
│   .python-version
│   pyproject.toml
│   README.md
├───docs
│       Install
├───src
│   └───example_uv
│           main.py
│           py.typed
└───tests
        __init__.py
Modify To a Flat Layout Structure
# PowerShell Commands
cd example_uv
New-Item -ItemType Directory example_uv
Move-Item main.py example_uv
# ..plus additional directory structure
EXAMPLE_UV
│   .gitignore
│   .python-version
│   pyproject.toml
│   README.md
├───docs
│       Installation.md
├───example_uv
│       main.py
│       py.typed
└───tests
        __init__.py
Add a Build-Backend
If you did not select a Package layout, you can manually add a build backend to your pyproject.toml:
[build-system]
requires = ["uv_build>=0.8.3,<0.9.0"]
build-backend = "uv_build"
You will have to change the project structure to match the expected Package layout though.
VSCode
Not much you need to do, UV is a separate management tool from the IDE. Don’t be fooled by VSCode UV extensions, there are no official ones and 3rd party extensions do goodness knows what and are not needed IMHO.
UV is a CLI, you create the project, venv and dependencies on a console (inside VSCode if you want, it makes no difference). Then develop your project as normal in VSCode (editing, testing, running, etc).
The only thing you have to do is ensure VSCode is using the project venv, which is normal whether that venv was created with UV or another tool.
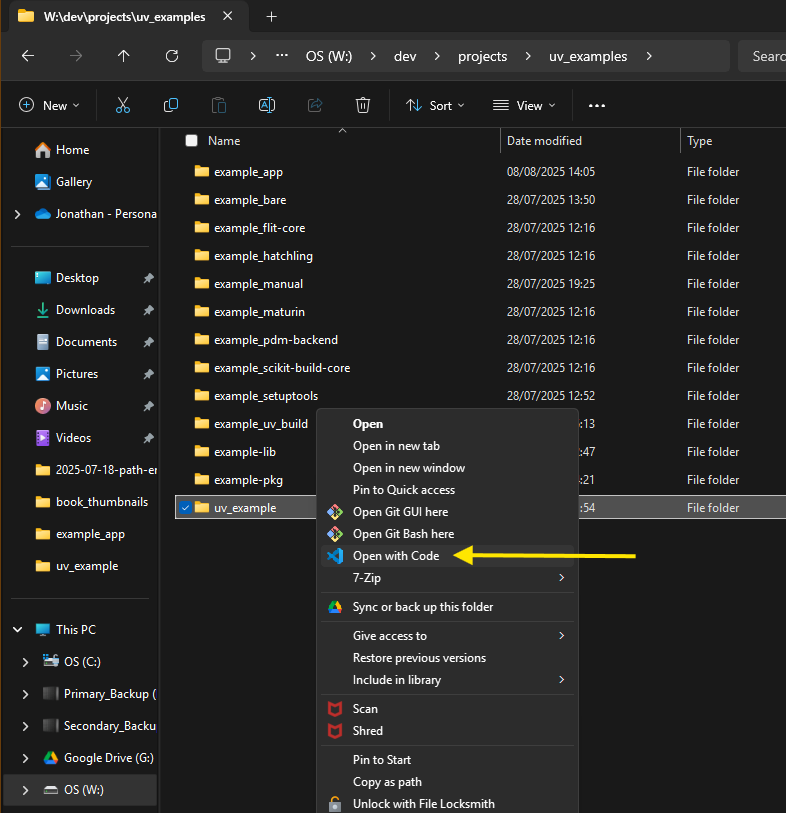
Start VSCode from the project directory on the console, or right-click the project directory in File Explorer and “Open with Code”:
cd $uv_example_proj  # I have PS alias' setup for different projects
code .
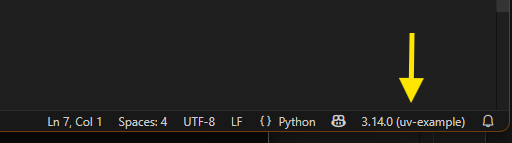
Whatever method, VSCode should identify the correct Python to use in the bottom right corner (sometimes takes a few seconds):
If none of that works, select the venv interpreter from the Command Palette (ctrl+shift+p or F1) and type Python:Select Interpreter. The venv should be in the drop down list, otherwise find the executable by browsing to the venv installation (.venv\Scripts\python.exe).
Example Workflow
cd $projects        # Alias to my projects directory
mkdir uv_example    # Create project directory
# Create a PS alias for this project
Add-Content -Value "$uv_proj=W:\dev\projects\uv_example" -Path $profile -Force
cd $uv_proj

# Initialize project with UV (Top-Level App Layout)
uv init

# Optionally convert to Src layout (in this case I'm doing it be a script)
W:\dev\projects\utils\convert_uv2src_proj.ps1 uv_example

# Create venv
uv venv

# Open in VSCode
code .
Conclusion
Switching to UV will hopefully make my Python development faster, more organized, and future-proof. The tool is evolving quickly, and while there are some concerns about its long-term direction, the benefits far outweigh the risks for most developers. If you want to modernize your workflow, give UV a try!
Further Reading
- UV: Documentation
- UV: Benchmarks
- PyPA: Python Packaging User Guide
- PyPA: Writing your pyproject.toml
- Stuart Ellis: Modern Good Practices for Python Development
- Aditya Ghadge: Why the ‘src’ Layout Beats Flat Folders
- Niels Cautaerts: Python Dependency Management
Edits to this Post
- 30 Oct 2025: Updated Markdown and removed emoji’s.
- 30 Oct 2025: Update and moved UV commands to top of page (easier referencing by me).
- 15 Nov 2025: Updated UV commands for uninstall and exporting and updating packages
- 11 Jan 2026: Added my favoured proj creation steps and formatted MD